


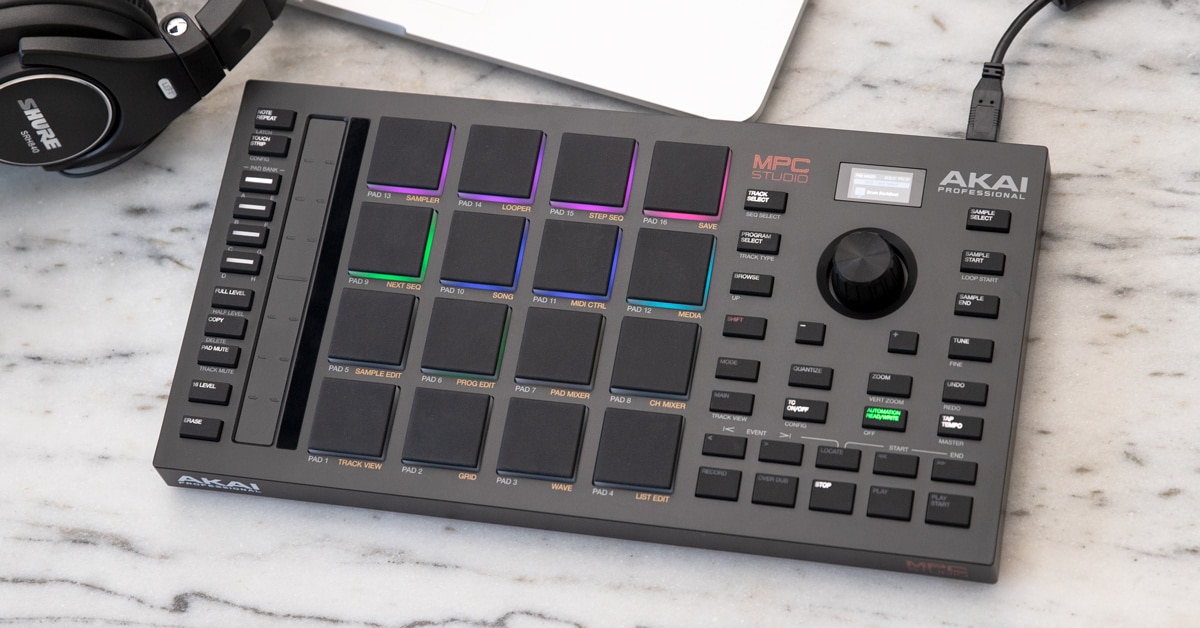
A testament to their legendary reputation amongst beatmakers, Akai Professional spared no consideration ensuring the new MPC Studio seamlessly caters to modern production workflows. Complete with cutting-edge MPC2 software, a pack of producer-friendly dynamics and effects plug-ins, a handy Touch Strip and features to fine-tune both rhythm and melody—and cut and layer samples—it’s equipped with all the tools you need to turn your ideas into music.
We spoke with Andy Mac, MPC sound and content project manager for Akai Professional, to get the story on the creation of the MPC Studio—as well as some fun and useful tips and tricks to maximize your production workflow.
The HUB: Who were you thinking of as you were designing the MPC Studio?
AM: MPC Studio is a versatile beat- and music-making machine, engineered for the masses. It’s perfect for those just getting into beatmaking and music production, but also powerful enough for professionals demanding the best tools and cutting-edge sounds. Current standalone MPC users (MPC One, MPC Live II, MPC X) will also find it handy as a secondary machine for creating on the go.
The HUB: MPC Studio is all about integration with MPC2 software. Outside of the obvious, what were the key workflows dreamed up for it?
AM: MPC Studio wasn’t just designed for laying the beat down with pads—it needed to go far deeper. The challenge was: How do we fit so many key features into a small desktop controller, but still offer it at an affordable price?
The first thing was making sure we added all the key buttons you’d need fast access to, along with some new ones. Quantize on/off was important, so you could adjust how tight or loose your beats are, along with all the key swing parameters. Being able to trim and layer samples was super important, because it’s a part of the production process.
The two amazing things were the Touch Strip, and how you can jump between all the Q-Link functions—massively expanding the capabilities of Studio, and the Transport control—which really makes the overall experience compelling. You can jump anywhere in the timeline, punch in and out, and all those key features to keep you in the zone.
The HUB: Just as important as what’s on the MPC Studio, like you just described, is what’s not on the MPC Studio. Can you speak to any of the addition and subtraction that you went through when designing it?
AM: The main topic really was the screen. Do we put in a large screen? Obviously, that would increase the price, but also impact the layout. We’d either be reducing the number of tactile buttons and controls, or be increasing the overall size of the controller.
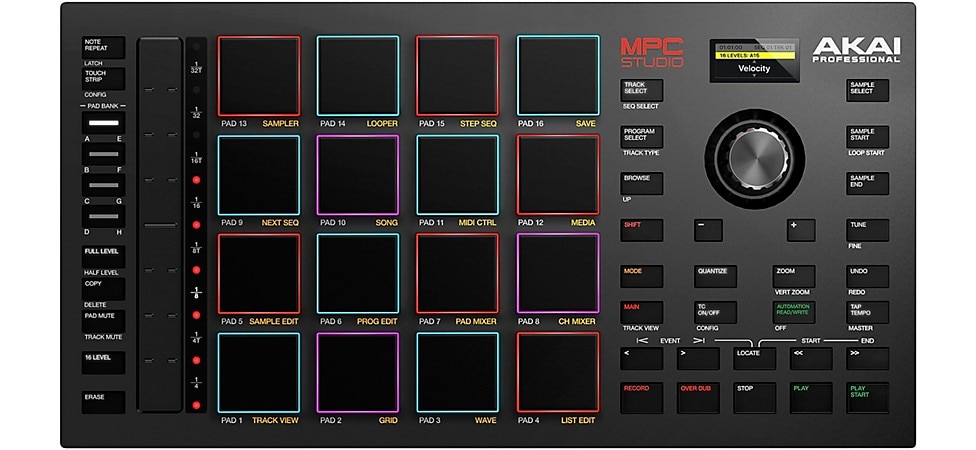
Knowing this is an MPC controller and that the customer would have a 13–15" screen on their computer, it made sense to focus on the workflow controls. We could maintain the form factor and low price, but still use a small screen for key visual feedback on the most relevant parameters. The screen provides so much information: track types, track number, sample start/end, layering, presets, swing amounts as well as all the Touch Strip presets and Q-Link modes.
The HUB: Can you speak a little bit to how the other models in the MPC line influenced the concept of MPC Studio?
AM: The current standalone models (MPC One, MPC Live II, MPC X) have had a lot of influence on the MPC Studio in terms of quality, design and workflow functionality. At the heart of all MPCs are the 16 velocity-sensitive RGB backlit pads with aftertouch, that offer an incredible music making experience for anyone. All the physical buttons, which offer control to the MPC workflow and functionality, were meticulously thought out for the most creative user experience.
The HUB: You mentioned what a big deal the Touch Strip is. The most obvious use is going to be for the “note repeat” function, but what other ways can you use it?
AM: The Touch Strip offers such a wide variety of control for creating new and cutting-edge sounds. There are multiple ways to use the Touch Strip, and we’ve made it easy to get started with many presets already assigned to control different FX parameters. Everything from pitch, delay, and modulation to frequency, cutoff and so much more is already mapped for users to experiment with. All of these presets can be manipulated and then saved as your own preset inside the plug-in, for creating signature sounds.
Using the Q-Link adds an even deeper layer of expression and assignable control directly from the Touch Strip. The bottom line is that the Touch Strip offers near limitless ways to make new and interesting sounds.
The HUB: On top of the real-time control that the Touch Strip offers, what degree of sound design do you have right on the controller?
AM: MPC Studio allows you to dig in deep. You can add layers of samples on each pad from the controller, as well as adjust the tuning and sample start and end times. You can also use the Touch Strip in Q-Link Screen Mode to dive into many of the synth macro controls, which can then be manipulated from the Touch Strip. You can even read/write automation from the controller.
If you like adding plug-in effects to the instruments, you can control plug-ins like the Granulator to really mess up the sound with the Touch Strip, allowing you to control all the parameters when in Screen Mode.
The HUB: To you, what are the most appealing qualities of the MPC2 software as compared to other DAWs on the market?
AM: For me, it’s the speed, iconic workflow and the sheer amount of features/content at such an affordable price. Plus, you get a professional controller in the box.
MPC software now includes over 100 effects, with everything you need from dynamics through to modern lo-fi effects, a range of instrument plug-ins, incredible sound content made by leading producers, audio/MIDI tracks, chord progressions, scales and even vocal tuning/harmony effects. What else do you need to start your journey?
We really want to make it easy and affordable for everyone to add some magic to their beats using the MPC workflow, which hands down is the most fun, fast and creative way to do it.
The HUB: You recently released MPC 2.10. What are you most excited about in this update?
AM: MPC 2.10 is the system running the desktop software, and the firmware of the standalone unit, and it’s really been a gamechanger in standalone music production.
First of all, we have incorporated a three-plug-in suite dedicated to vocals with the AIR Vocal Suite. Automatic vocal tuning, doubling and the ability to create four-part harmonies in both the desktop software for the MPC Studio—and also in the standalone MPCs. We’ve also added seven new insert effects plug-ins, including Half Speed.
In MPC 2.10, there are four brand-new plug-in instruments delivering thousands of presets and sonic possibilities straight out the box: Hype, Mellotron, WayOutWare Odyssey and Solina. You now have a total of eight virtual instruments.
The HUB: What do you think is the most producer-friendly feature of the MPC Studio and MPC2 combo?
AM: Note Repeat on the Touch Strip. This is a fast and easy way to get the sound, without having to manually draw in endless hi-hats. I love this feature.
The HUB: Can you talk a little bit about how you can use MPC 2.1 as a VST in an existing DAW? What type of functionality can producers expect from that, as compared to using it as a standalone DAW?
AM: MPC Software can run as a virtual instrument plug-in inside any major DAW, such as Pro Tools, FL Studio or Ableton, to name just a few. This means you can go back and forth between MPC workflow and your preferred DAW workflow seamlessly. For example, you can create a beat using the MPC plug-in on a track of your DAW (using the MPC Studio controller, of course). Then, comp guitars and vocals using your DAW’s normal workflow, and then go back to the MPC plug-in to use the AIR Vocal Suite. It all integrates beautifully.
The HUB: Could you let us in on any less obvious workflows or tricks you’d recommend people check out?
AM: Yes—the lazy sample chop mode. Drop a loop onto a pad, then press “Sample Edit” followed by the “Chop” tab (found underneath the sample wave view). The pads will now allow you to chop the sample in real time.
It’s such a fun way to take a loop and make it your own. You can then turn your chops into a program and insert the Half Speed plug-in on the program. In just a few seconds, you have really flipped the sample. From there, drop your beat over the top, and you’ve made a track.